

10 Scaffolding Strategies for Struggling Students: A Practical Teacher Guide
Students do not always struggle because they lack ability. They may be learning unfamiliar content, processing instructions in a second language, missing prerequisite knowledge, or needing a different way to approach a task.
Scaffolding in teaching helps teachers respond to these barriers by providing temporary support that enables students to participate in meaningful learning.
This does not make difficult work permanently easier. Instead, effective scaffolding gives students enough structure to complete a task, understand the thinking behind it, and gradually become more independent.
I am presenting 10 practical scaffolding strategies for struggling students, with classroom examples, implementation steps.
What Is Scaffolding in Education?
In teaching, scaffolding refers to temporary instructional support that helps students accomplish a learning task that they may not yet be able to complete independently.
A teacher might scaffold learning by:
- activating prerequisite knowledge;
- modeling a process;
- breaking a complex task into manageable steps;
- providing sentence starters;
- using worked examples;
- offering visual representations;
- checking understanding frequently;
- giving structured practice;
- providing feedback;
- gradually removing support as students gain competence.
The important word is temporary.
If a scaffold remains unchanged indefinitely, it can become a crutch rather than a bridge toward independence.
Scaffolding Is Not the Same as Lowering Expectations
A common misconception is that supporting struggling students means reducing academic expectations.
Effective scaffolding does something different.
The teacher can maintain the same meaningful learning goal while changing the path students use to reach it.
For example, if the learning objective is for students to explain the causes of an event using evidence, a scaffold might provide:
- a cause-and-effect organizer;
- a short model response;
- vocabulary support;
- guiding questions; and
- a paragraph structure.
The objective remains intellectually meaningful. The temporary support simply makes the thinking process more accessible.
10 Scaffolding Strategies for Struggling Students
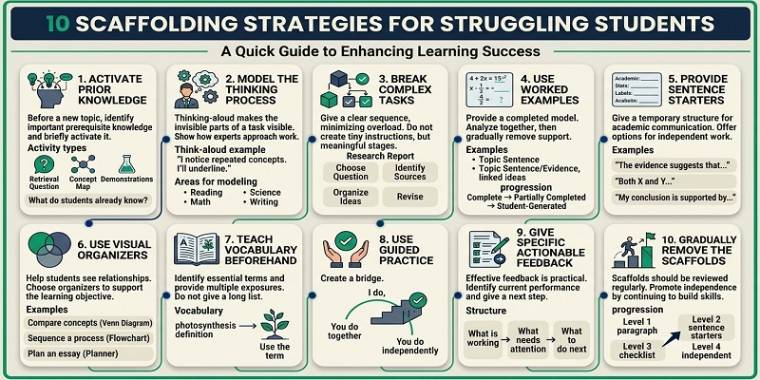
Let’s discuss the 10 best scaffolding strategies that teachers can implement to break complex lessons in small and understandable chunks.
1. Activate Prior Knowledge
Students often struggle with new material because they are missing knowledge or concepts needed to understand it.
Before introducing a new topic, identify the most important prerequisite knowledge and briefly activate it.
How to use this strategy
Start with a short activity such as:
- a retrieval question;
- a concept map;
- a “What do you already know?” prompt;
- a quick vocabulary review;
- a diagram students label;
- a short demonstration.
To understand activating prior knowledge in detail read:
Avoid turning the warm-up into a lengthy review of everything previously taught.
Focus only on knowledge that students need for the upcoming lesson.
Classroom example
Before teaching fractions, ask students to identify:
- numerator;
- denominator;
- equal parts;
- whole numbers; and
- simple fraction representations.
If students cannot explain these concepts, address the specific gap before moving into more complex fraction operations.
Teacher question
“What do students need to know before they can successfully complete today’s task?”
That question can help prevent students from repeatedly failing at a task because of an earlier knowledge gap.
2. Model the Thinking Process
Students may understand the final answer without understanding how an expert arrived at it.
Modeling makes the invisible parts of a task more visible.
Instead of saying:
“Read the passage and find the main idea.”
show students how you approach the task.
Think-aloud example
A teacher might say:
“I’m looking at the first paragraph. I notice that several sentences discuss the same idea. I’m going to underline the repeated concept and then check whether it explains what the entire paragraph is mainly about.”
The teacher is demonstrating a process rather than simply presenting an answer.
Use modeling for
- reading comprehension;
- mathematical problem solving;
- scientific investigations;
- essay writing;
- source analysis;
- technology tasks;
- project planning.
After modeling, give students an opportunity to try the same process with guidance.
3. Break Complex Tasks into Smaller Steps
A large task can become overwhelming when students do not know where to begin.
Chunking reduces unnecessary cognitive demands by giving students a clear sequence.
For example, instead of assigning:
“Write a research report about climate change.”
break the task into stages:
- Choose a focused question.
- Identify appropriate sources.
- Record relevant information.
- Organize ideas.
- Draft the introduction.
- Develop the main sections.
- Add evidence.
- Revise.
- Proofread.
- Submit the final report.
Important caution
Breaking a task into steps does not mean creating dozens of tiny instructions.
Too many steps can create another problem: students become dependent on the teacher for what to do next.
Start with meaningful stages and refine them when students need additional support.
4. Use Worked Examples
A worked example shows students what a successful response or process looks like.
Instead of asking students to produce a complex answer from scratch, provide an example and analyze it together.
For writing
Show a model paragraph and identify:
- topic sentence;
- evidence;
- explanation;
- linking language; and
- concluding idea.
For mathematics
Show a completed problem and discuss:
- what information was identified;
- which operation was selected;
- why that operation was appropriate;
- how the calculation was completed; and
- how the answer was checked.
Gradually remove the example
A useful progression is:
Complete example → partially completed example → student-generated response
This allows support to decrease as competence increases.
5. Provide Sentence Starters and Academic Language
Students can understand an idea but still struggle to express it.
Sentence starters provide a temporary structure for academic communication.
Examples
For evidence-based writing:
- “The evidence suggests that…”
- “One important reason is…”
- “This example demonstrates…”
- “The source supports this interpretation because…”
For comparing ideas:
- “Both ___ and ___ have…”
- “One similarity is…”
- “In contrast…”
- “The main difference is…”
For scientific reasoning:
- “I observed…”
- “The data indicate…”
- “One possible explanation is…”
- “My conclusion is supported by…”
Don’t make every student use the same starter forever
Once students become comfortable expressing the idea independently, remove the starter or offer it only as an optional support.
The objective is independent academic communication, not permanent sentence completion.
6. Use Visual Organizers
Some students benefit from seeing relationships among ideas rather than receiving information only through spoken or written explanations.
Visual organizers can help students:
- sequence events;
- compare concepts;
- classify information;
- identify causes and effects;
- organize evidence;
- plan writing; and
- summarize learning.
Useful organizers
| Learning task | Possible organizer |
| Compare two concepts | Venn diagram |
| Explain causes | Cause-and-effect chart |
| Sequence a process | Flowchart |
| Organize an argument | Claim-evidence-reasoning organizer |
| Plan an essay | Paragraph planner |
| Classify information | Concept map |
| Record observations | Data table |
The organizer should support the learning objective rather than become an extra worksheet students complete without thinking.
7. Teach Vocabulary Before It Becomes a Barrier
Unfamiliar vocabulary can prevent students from understanding an otherwise accessible lesson.
Rather than giving students a long vocabulary list, identify the small number of terms that are essential to understanding the task.
For each important term, consider providing:
- a student-friendly definition;
- an example;
- a visual representation when appropriate;
- a non-example;
- pronunciation support when useful; and
- an opportunity to use the word in context.
Example
Instead of simply defining photosynthesis, connect the term to the process students are studying:
Photosynthesis: the process by which plants use light energy to make food from water and carbon dioxide.
Then ask students to use the term when explaining a diagram or observation.
Vocabulary becomes more useful when students encounter and apply it in meaningful contexts.
8. Use Guided Practice Before Independent Practice
A common classroom pattern is:
Teacher explains → students work independently.
For students who are struggling, there may be too large a gap between those two stages.
Guided practice creates a bridge.
A practical sequence
I do → We do → You do together → You do independently
For example:
I do
The teacher solves and explains one problem.
We do
The class solves another problem with teacher guidance.
You do together
Students work in pairs and explain their reasoning.
You do independently
Students complete a similar problem without direct assistance.
This sequence provides opportunities for the teacher to identify misunderstandings before students practice errors independently.
9. Give Specific, Actionable Feedback
“Good job” and “Try harder” provide little information about what students should do next.
Effective feedback identifies the current performance and gives the learner a practical next step.
Instead of:
“Your paragraph needs improvement.”
Try:
“You have a clear claim. Add one piece of evidence and explain how that evidence supports your claim.”
Instead of:
“Check your math.”
Try:
“Your calculation is correct up to step two. Recheck which operation you used in step three and explain why it is appropriate.”
A useful feedback structure
What is working → What needs attention → What to do next
This makes feedback easier for students to act on.
10. Gradually Remove the Scaffolds
The ultimate purpose of scaffolding is student independence.
A scaffold should therefore be reviewed regularly.
Ask:
- Can the student complete this step without assistance?
- Which support is still necessary?
- Which support can now be reduced?
- Is the student transferring the skill to a new task?
- Can the student explain the process independently?
Example
A writing scaffold might progress from:
Level 1: Full paragraph model
↓
Level 2: Partially completed paragraph
↓
Level 3: Sentence starters
↓
Level 4: Planning checklist
↓
Level 5: Independent writing
Not every student needs to move through every level at the same speed.
The teacher’s role is to provide enough support to promote success while continuing to build independence.
10 Scaffolding Strategies for Struggling Students
Before introducing a new topic, identify prerequisite knowledge and briefly activate it to prevent early misunderstandings.
- Retrieval questions
- Concept mapping
- Quick vocabulary reviews
Make cognitive steps visible using “think-alouds” to demonstrate how experts approach reading, math, and problem-solving.
Chunk large assignments into clear, sequential stages to manage cognitive load without creating over-dependence on step-by-step prompts.
Provide complete or partial models to analyze together before asking students to generate independently.
Offer temporary linguistic structures to help students express academic arguments in writing and discussion.
- “The evidence suggests that…”
- “Both X and Y share…”
- “My conclusion is supported by…”
Utilize graphic organizers to help students visually structure, compare, sequence, and connect concepts.
- Venn Diagrams (Compare)
- Flowcharts (Sequencing)
- CER Frameworks (Argumentation)
Introduce essential terms prior to instruction with student-friendly definitions, visual aids, and contextual practice opportunities.
Bridge direct instruction and independent application using structured release of responsibility.
Provide targeted guidance highlighting current performance, focus areas, and practical next steps.
Regularly evaluate student progress to fade scaffolds systematically and foster complete academic independence.
A Practical Scaffolding Framework for Teachers
The following four-stage framework can help teachers decide how much support to provide.
Stage 1 — Identify the Barrier
Determine why the student is struggling.
Is the difficulty related to:
- prerequisite knowledge?
- vocabulary?
- task complexity?
- reading demands?
- unclear instructions?
- lack of practice?
- difficulty organizing information?
- difficulty monitoring their own work?
Avoid assuming that all struggling students need the same intervention.
Stage 2 — Select a Targeted Scaffold
Choose the support that addresses the specific barrier.
For example:
Vocabulary barrier → vocabulary preview
Organization barrier → graphic organizer
Process barrier → teacher modeling
Task-complexity barrier → chunking
Communication barrier → sentence starter
Stage 3 — Monitor Student Performance
Use brief checks during the lesson.
Examples include:
- questioning;
- mini-whiteboards;
- exit tickets;
- short practice tasks;
- student explanations;
- observation;
- quick self-assessments.
Stage 4 — Fade the Support
When students demonstrate increasing independence, reduce the scaffold.
Do not remove every support at once.
Instead, gradually transfer responsibility from teacher to student.
Scaffolding Strategies by Common Student Need
| Student need | Useful scaffold |
| Missing prerequisite knowledge | Retrieval/review activity |
| Unfamiliar vocabulary | Vocabulary preview |
| Difficulty understanding instructions | Chunked directions |
| Difficulty starting a task | Worked example |
| Difficulty organizing ideas | Graphic organizer |
| Difficulty expressing ideas | Sentence starters |
| Difficulty solving problems | Teacher modeling |
| Difficulty working independently | Guided practice |
| Repeated errors | Specific feedback |
| Increasing competence | Gradual removal of supports |
This table should be used as a starting point, not a diagnostic tool. The same student may need different scaffolds for different tasks.
Common Scaffolding Mistakes to Avoid
Giving Too Much Help
If the teacher provides every step, students may complete the task without developing the underlying skill.
Keeping Scaffolds Forever
A support that was appropriate during initial learning may become unnecessary later.
Lowering the Learning Goal
Scaffolding should not automatically mean giving students less meaningful work.
Using the Same Scaffold for Everyone
Students have different strengths, prior knowledge, and learning barriers.
Confusing Completion with Learning
A student may complete a scaffolded worksheet successfully but still be unable to apply the concept independently.
Adding Too Many Worksheets
A scaffold is not automatically effective simply because it is printed.
The support should make the thinking process clearer, not create unnecessary workload.
Scaffolding vs. Differentiation
Scaffolding and differentiation are related but not identical.
Scaffolding generally refers to temporary support that helps a learner access or perform a task.
Differentiation involves intentionally adjusting aspects of teaching and learning—such as content, process, product, or learning environment—to respond to learner differences.
A teacher may use differentiation to provide different scaffolds to different students.
For example, one student may need a vocabulary bank, while another may need a graphic organizer and a third may be ready for independent application.
The common principle is to maintain meaningful learning while responding to actual learner needs.
Scaffolding Checklist for Teachers
Before or during a lesson, ask:
Learning goal
- Is the learning objective clear?
- Do students have the prerequisite knowledge needed for the task?
Task
- Is the task appropriately challenging?
- Which part is likely to create difficulty?
Support
- Would modeling help?
- Would chunking help?
- Would students benefit from a visual organizer?
- Is vocabulary creating a barrier?
- Would guide practice provide a useful bridge?
Feedback
- Am I giving students a specific next step?
- Can students use the feedback immediately?
Independence
- Which scaffold can be reduced?
- Can students demonstrate the skill independently?
- Can they transfer the skill to a new context?
Frequently Asked Questions
What is the purpose of scaffolding?
The purpose of scaffolding is to provide temporary instructional support that helps students access challenging learning tasks and progressively develop independence.
Is scaffolding only for struggling students?
No. Scaffolding can support any learner encountering a new, complex, or unfamiliar task. The level and type of support should reflect the learner’s current needs.
Does scaffolding lower academic expectations?
Not necessarily. Effective scaffolding can maintain a challenging learning objective while providing students with a more accessible pathway toward achieving it.
When should teachers remove scaffolds?
Teachers should reduce scaffolding when students demonstrate sufficient understanding and can perform the relevant skill with less assistance.
What is an example of scaffolding?
A teacher might model how to solve a problem, guide students through a similar example, provide a partially completed problem, and then ask students to solve a new problem independently.
How can teachers scaffold writing?
Teachers can use mentor texts, worked examples, planning organizers, sentence starters, vocabulary banks, guided practice, feedback, and gradually reduced support.
Final Takeaway
Effective scaffolding is not about doing difficult work for students.
It is about making the path to independent learning clearer.
Teachers can begin by identifying the specific barrier, selecting a targeted support, monitoring student understanding, and gradually reducing assistance as students become more capable.
The most useful question is not:
“How can I make this task easier?”
Instead, ask:
“What temporary support will help this student successfully learn to do this independently?”
That shift keeps scaffolding focused on learning, rather than simply on task completion.