
How to Make a Gimkit: Create a Kit Step by Step
If you want to use Gimkit for review, practice, or formative assessment, the first thing you need is a Kit. A Kit contains the questions and answers that students use during a Gimkit activity.
You can create a Kit from scratch, import questions from a spreadsheet, use Gimkit’s Question Bank, or bring in content through supported import options. Gimkit’s current Help Center confirms that educators can create Kits and use them when hosting games.
The process doesn’t take long once you know where the tools are.
This guide walks you through the current process and gives you practical advice for creating questions that actually support learning.
What Is a Gimkit Kit?
A Kit is the question set you use to create Gimkit learning activities.
Think of it as your question bank for a particular lesson or topic.
For example, a Grade 6 science teacher could create a Kit called:
Grade 6 Science: Photosynthesis
The Kit might include questions about:
- Chlorophyll
- Sunlight
- Carbon dioxide
- Glucose
- Oxygen
- The photosynthesis equation
Once you create the Kit, you can use it with Gimkit’s available activities and practice options.
Gimkit also lets teachers edit Kits later, so you don’t have to create the perfect question set in one sitting.
Is Gimkit Free to Use?
Gimkit currently offers Gimkit Basic, which educators can use for free. Gimkit also offers the paid Gimkit Pro plan with additional features.
According to Gimkit’s current account information, free educator accounts can create Kits, host games, create classes, and collect game reports. New educator accounts also receive a 14 day Pro trial before moving to the Basic plan if they don’t upgrade.
Some features, including assignments, audio questions, image uploads, and certain game modes, require Pro access.
So you can start creating a Kit without paying for a subscription.
What You Need Before Creating a Gimkit
You’ll need a Gimkit educator account to create Kits and host games.
Gimkit says educator accounts can sign up with Google or email.
Before you start, prepare:
- Your lesson topic
- Your learning objective
- Your questions
- Correct answers
- Incorrect answer choices where appropriate
- Any images or media you plan to use
- A suitable Kit name
A little preparation helps.
Don’t open the Kit editor and start inventing questions randomly. Decide what students should learn first.
How to Make a Gimkit From Scratch
Creating a new kit on Gimkit allows teachers to turn lesson content into interactive questions for classroom practice, review, and games.
You can create a kit around a specific lesson, topic, chapter, or subject and reuse it whenever students need practice.
Step 1: Click “New Kit.”
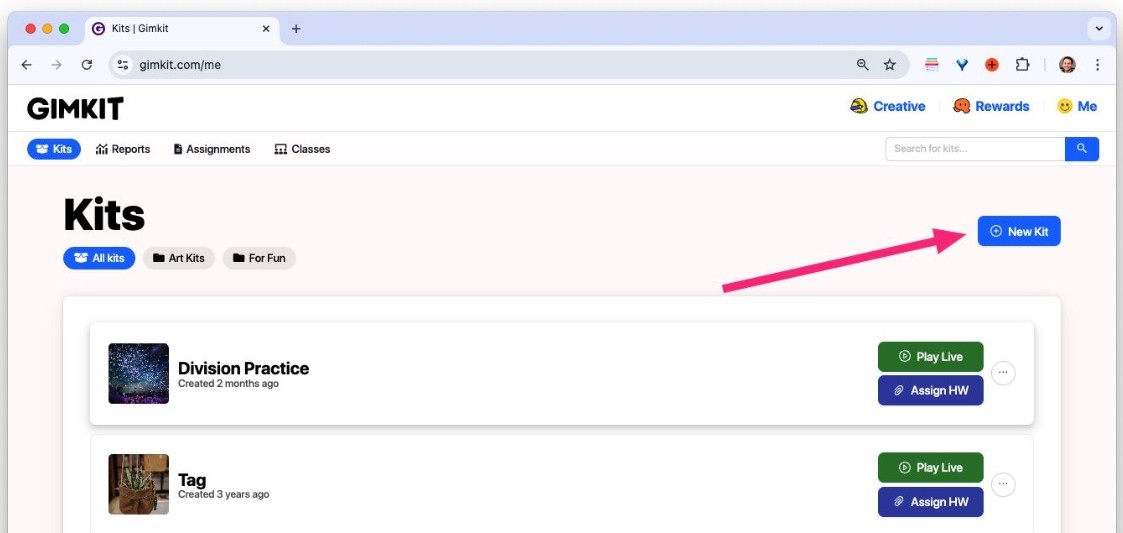
Start by opening your Gimkit dashboard. Go to Gimkit.com/me and sign in to your account.
From the dashboard, click the “New Kit” button.
Step 2: Enter Your Kit Information
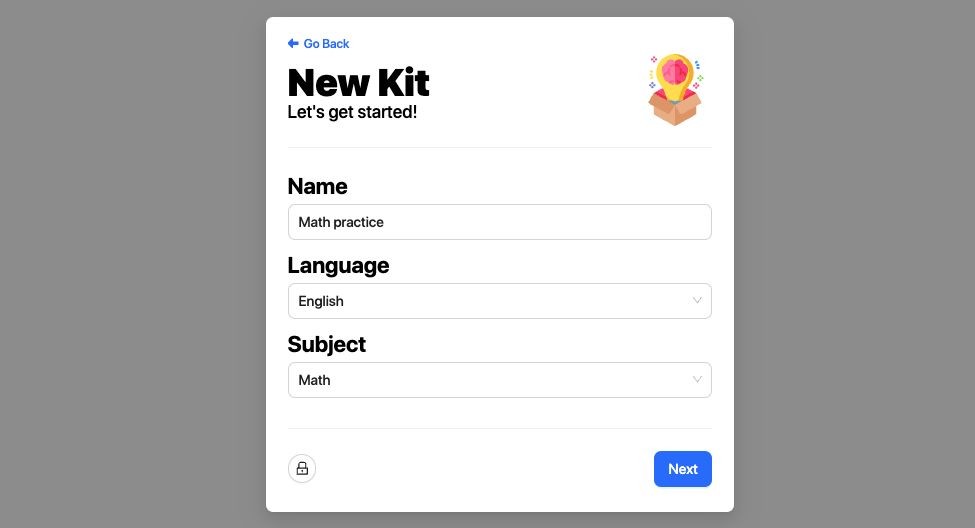
Gimkit will ask you for basic information about your new kit.
Enter:
- Kit name: Give your kit a clear and recognizable name.
- Language: Select the language used in your questions.
- Subject: Choose the subject that best matches your kit.
Make sure the information accurately describes your kit so it is easier to identify later.
Step 3: Choose a Cover Image
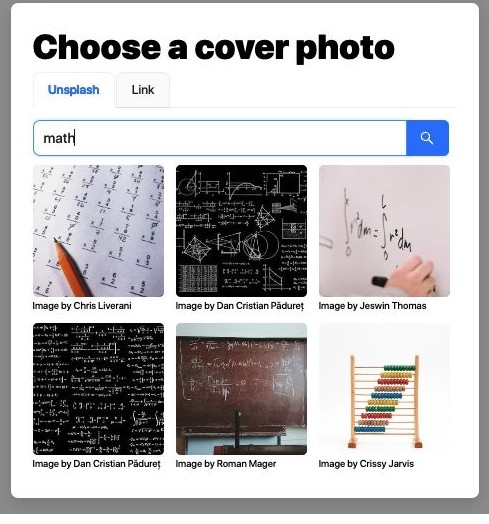
Next, select a cover image for your kit.
Gimkit allows you to choose an image from Unsplash. You can also use an image available elsewhere on the web by providing its image link.
To use an image from the web:
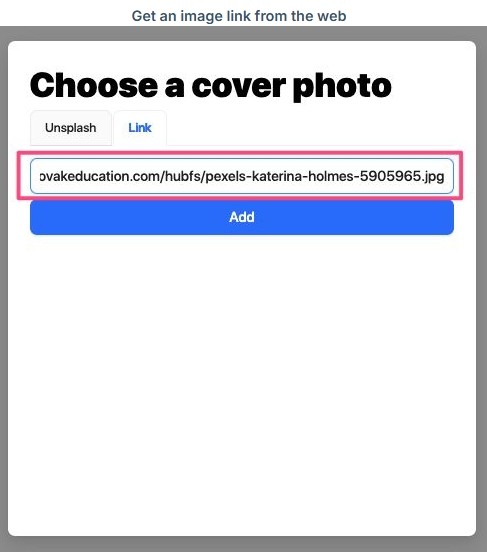
- Find an image you want to use.
- Copy the image URL or direct image link.
- Return to Gimkit.
- Paste the link into the cover image field.
- Confirm the image you want to use.
Choose an image that clearly relates to your kit topic. A relevant cover makes your kit easier to recognize on your dashboard.
Step 4: Add Questions to Your Kit
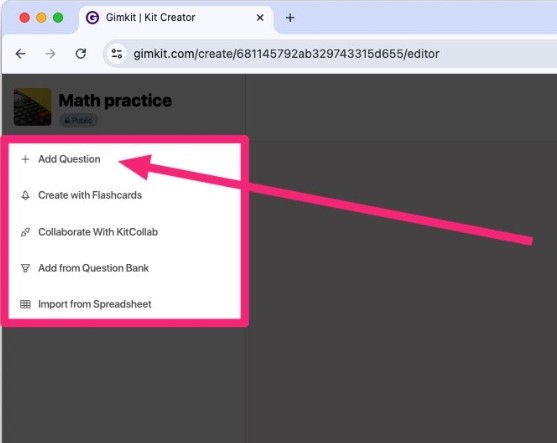
After setting up the basic kit information, you can start adding questions.
Gimkit provides several ways to add questions. If you want to create your own questions manually, select “Add a Question.”
This option lets you build each question from scratch.
Step 5: Create Your Question
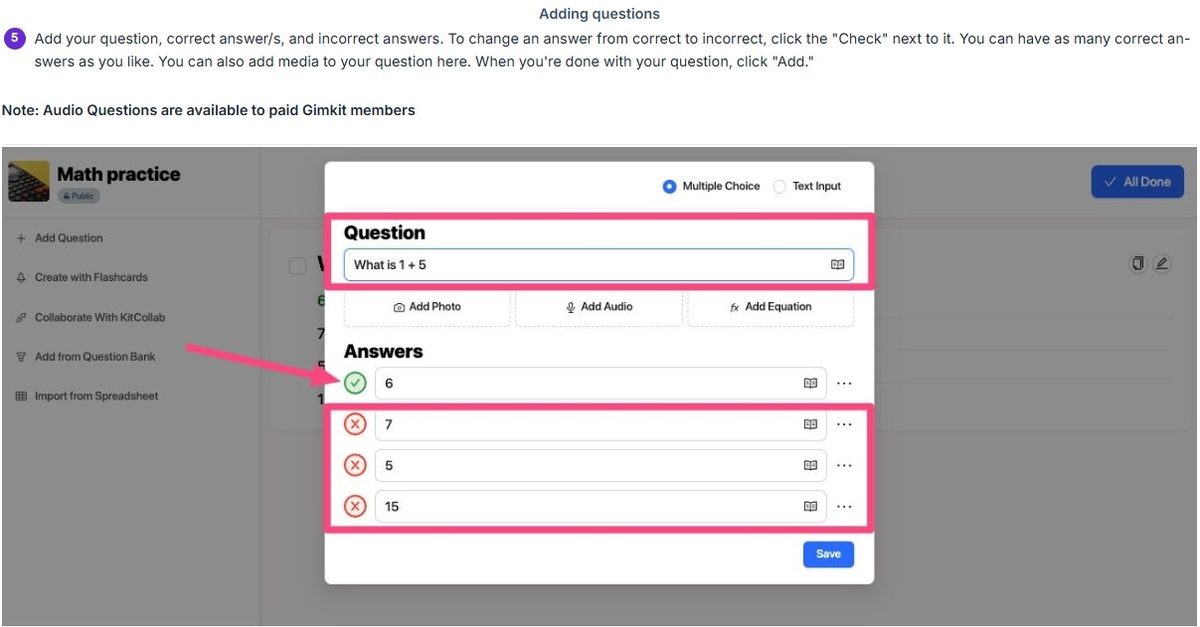
Enter the question you want students to answer.
Then add the possible answers. You can mark the correct answer or answers by clicking the check mark next to them.
You can also:
- Add multiple correct answers when appropriate.
- Add incorrect answer choices.
- Add media to the question.
- Change an answer from correct to incorrect by clicking its check mark.
Once you have entered everything you need, click “Add” to save the question to your kit.
Note: Audio questions are available to paid Gimkit members.
Continue adding questions until your kit contains all the material you want students to practice.
Step 6: Finish Creating Your Kit
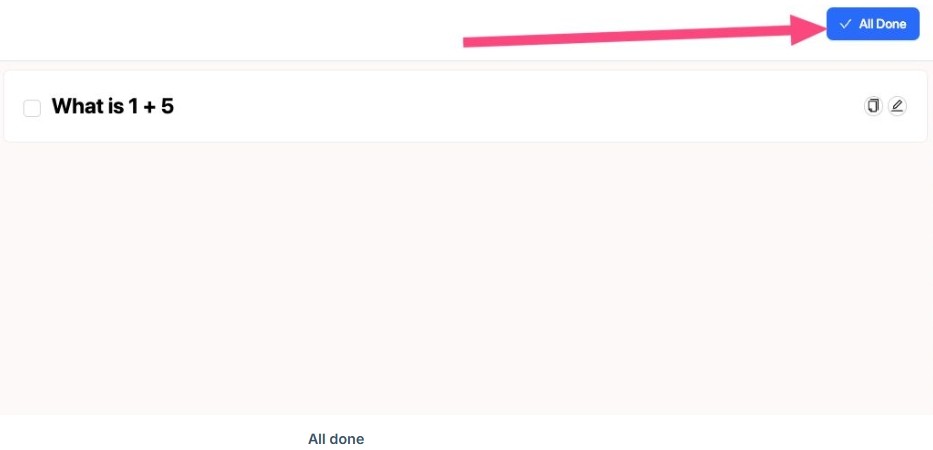
When you have finished adding questions, click “All Done.”
Gimkit will take you back to your dashboard, where you can access the kit you just created.
Step 7: Use Your New Kit
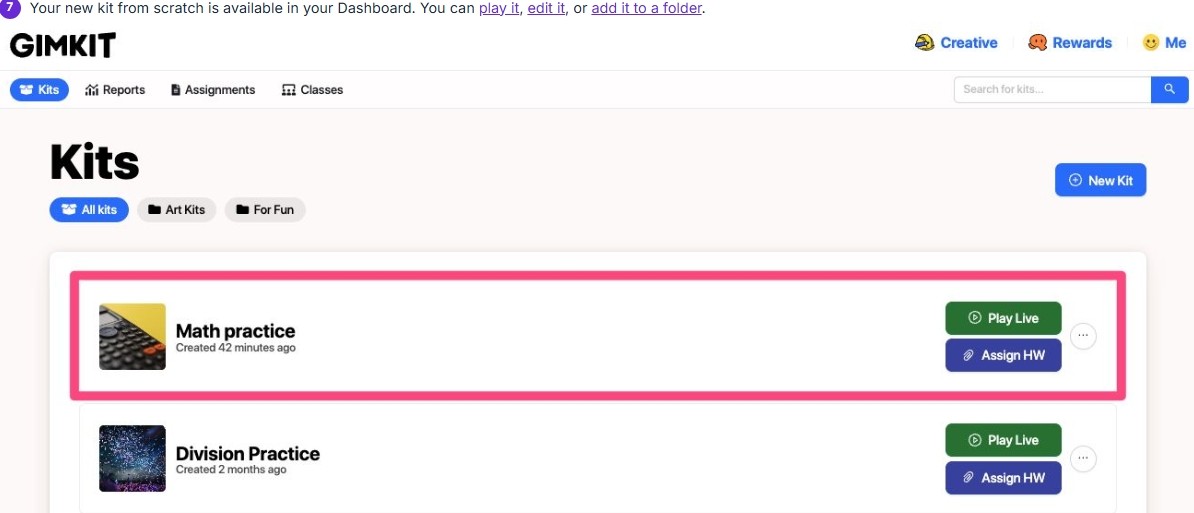
Your newly created kit will now appear on your Gimkit dashboard.
From there, you can:
- Play the kit by hosting a live game.
- Edit the kit if you want to change its questions or information.
- Add the kit to a folder to keep your Gimkit dashboard organized.
Your kit is now ready to use for classroom practice, review activities, or live Gimkit games.
How Many Questions Should a Gimkit Have?
There’s no single ideal number.
The right number depends on:
- Grade level
- Lesson length
- Subject
- Learning objective
- Game mode
- How often students will reuse the Kit
For a short review, you might create around 10 to 15 strong questions.
For a larger unit review, you may want considerably more.
Quality matters more than filling the Kit with repetitive questions.
Twenty carefully designed questions can provide more useful practice than 100 weak ones.
How to Make Good Gimkit Questions
A good Kit starts with good questions.
Match questions to your objective
If your objective says:
Students will compare fractions using common denominators.
Don’t fill the Kit with unrelated fraction vocabulary questions.
Mix difficulty levels
Try a rough progression:
Easy: Recall a fact
Medium: Explain or identify a concept
Harder: Apply the concept to a new situation
This helps you see more than whether students memorized definitions.
Avoid trick questions
Students should lose because they don’t understand the content, not because the wording tries to trap them.
Keep wording clear
Short questions often work well during game play.
If students need to read a paragraph before every question, the game can become unnecessarily slow.
How to Make a Gimkit From a Spreadsheet
You don’t have to enter every question manually.
Gimkit also supports CSV spreadsheet imports.
This works particularly well if you already have a large question bank in Excel or Google Sheets.
Gimkit’s current Help Center explains that teachers can select Import from Spreadsheet from the Kit editor, use a provided template, save the completed spreadsheet as a CSV file, and upload it.
Step by Step: Import Questions From a CSV
Step 1: Create a New Kit
Click New Kit from your dashboard.
Enter the basic Kit information.
Step 2: Select Import From Spreadsheet
Inside the Kit editor, choose Import from Spreadsheet.
Gimkit provides templates for preparing your questions.
Step 3: Download or Open the Template
Use Gimkit’s spreadsheet format.
Don’t rearrange the columns unless Gimkit’s current instructions tell you to do so.
Incorrect column placement can cause import problems. Gimkit identifies incorrect spreadsheet columns as one of the common causes of CSV import errors.
Step 4: Add Your Questions
Enter your questions and answers in the appropriate columns.
For example, your working spreadsheet might contain:
| Question | Correct Answer | Incorrect Answer | Incorrect Answer | Incorrect Answer |
|---|---|---|---|---|
| What is 7 × 8? | 56 | 54 | 48 | 64 |
| What is 12 ÷ 3? | 4 | 3 | 5 | 6 |
Follow the exact structure of Gimkit’s current template when preparing the actual upload.
Step 5: Save as CSV
Download or save the completed spreadsheet as a CSV file.
Step 6: Upload the File
Return to Gimkit.
Select the upload option and choose your CSV file.
Gimkit says the platform will take you back to your dashboard after a successful import, where you can review and edit your new Kit.
How to Use Gimkit’s Question Bank
You don’t always need to write every question yourself.
Gimkit has a Question Bank that lets teachers search questions from public Kits and add selected questions to their own Kits.
To use it:
- Create a new Kit or open one you own.
- Select Add from Question Bank.
- Search for a topic or term.
- Review the available questions.
- Select the questions you want.
- Add them to your Kit.
- Continue editing your Kit.
Gimkit’s Question Bank can search public Kits and your own Kits.
Should You Use Questions From Other Teachers?
Yes, but review them first.
Never assume a public question automatically matches your curriculum.
Check:
- Accuracy
- Grade level
- Wording
- Difficulty
- Correct answer
- Distractors
- Curriculum alignment
- Cultural sensitivity
- Potential ambiguity
A question written for one class may not fit yours.
You remain responsible for what you give your students.
How to Edit a Gimkit You Already Created
You can edit Kits you own.
Open the Kit and select Edit.
Gimkit’s current editor lets teachers add questions, edit individual questions, bulk edit questions, delete selected questions, and change questions into text input questions where supported.
Gimkit also says changes save automatically when you have a stable internet connection, with the editor showing All changes saved when the changes have saved successfully.
How to Copy an Existing Gimkit
Suppose you created:
Grade 6 Math: Fractions
Now you want a second version:
Grade 6 Math: Fractions Review
You can copy your Kit and then edit the copy.
Gimkit’s current instructions say to open the Kit, select Copy, and then rename or edit the new copy.
This can save time when you want several related versions.
How to Create a Gimkit for Different Ability Levels
You can create separate Kits for different learning needs.
For example:
Kit A: Fraction Foundations
- Equivalent fractions
- Numerators and denominators
- Comparing simple fractions
Kit B: Grade Level Fraction Practice
- Addition
- Subtraction
- Multiplication
- Word problems
Kit C: Fraction Challenge
- Multi step problems
- Real world applications
- Complex fraction reasoning
This gives you a more practical way to differentiate practice.
How to Create a Gimkit for Formative Assessment
You can also build a Kit specifically to check understanding.
Suppose you teach:
Adding fractions with unlike denominators
Create questions that reveal common misconceptions.
What is:
1/2 + 1/3
A: 2/5
B: 5/6
C: 1/6
D: 2/6
The distractors can reveal how students think.
A student choosing 2/5 may be adding the numerators and denominators directly.
That information can help you decide what to reteach.
This makes the Kit more useful than a simple collection of random questions.
Use Gimkit Questions to Check Misconceptions
This is one of the best ways to design a teacher created Kit.
Don’t only ask:
“What is the correct answer?”
Ask questions that expose common errors.
For example:
Math
Which step contains the error?
Science
Which statement incorrectly explains the process?
English
Which sentence uses the comma incorrectly?
History
Which claim does the source evidence fail to support?
These questions require more thinking than simple recall.
How to Make a Gimkit Kit for Vocabulary
Gimkit works well for vocabulary review.
For example:
Term: Photosynthesis
Correct answer: The process plants use to convert light energy into chemical energy
Incorrect answers:
- The process plants use to absorb minerals
- The process animals use to breathe
- The process cells use to divide
You can also create context questions.
Which sentence uses the word “photosynthesis” correctly?
Context gives students a chance to apply the term rather than simply memorize a definition.
How to Make a Gimkit Kit for Math
For mathematics, don’t create a Kit containing nothing but calculations.
Mix question types.
Calculation
What is 15 × 6?
Concept
Why does multiplying a number by 10 shift its digits one place to the left in the base ten system?
Application
A teacher has 15 boxes containing 6 pencils each. How many pencils does the teacher have?
Error analysis
A student says 15 × 6 = 80. What mistake might the student have made?
This gives you a better view of mathematical understanding.
How to Make a Gimkit Kit for Science
Science Kits can combine:
- Vocabulary
- Processes
- Diagrams
- Data interpretation
- Cause and effect
- Experimental reasoning
For example:
A student increases the amount of sunlight available to a plant while keeping other conditions constant. What variable did the student change?
The answer:
Independent variable
You can follow it with:
What should the student measure to determine whether the change affected plant growth?
Now the questions build on one another.
How to Make a Gimkit Kit for English Language Arts
ELA questions can cover:
- Vocabulary
- Grammar
- Literary elements
- Reading comprehension
- Text evidence
- Writing conventions
For reading comprehension, don’t rely entirely on isolated grammar questions.
Give students a short passage and ask them to identify:
- Main idea
- Inference
- Character motivation
- Evidence
- Author’s purpose
Keep passages manageable for the game format.
How to Make a Gimkit Kit for Social Studies
Social studies Kits can include:
- Dates
- People
- Events
- Causes
- Effects
- Primary source interpretation
- Geography
- Historical reasoning
Instead of asking only:
When did the American Revolution begin?
You can ask:
Which development contributed most directly to growing colonial opposition to British taxation?
Questions like this encourage students to think about relationships between events.
Review Your Gimkit Before Students Play
Don’t immediately launch the Kit after creating it.
Preview it.
Check every question.
Content accuracy
Is the answer actually correct?
Wording
Could students interpret the question in more than one way?
Distractors
Are the incorrect answers plausible?
Difficulty
Do the questions match the students’ level?
Curriculum alignment
Does the Kit support what you’re teaching?
Spelling
Check names, terminology, and punctuation.
Five minutes of review can prevent a lot of confusion during class.
How to Test Your Gimkit
Gimkit provides Practice Mode, which allows teachers to preview the questions and answers in a Kit. Gimkit says teachers can use Practice Mode to test their content or let students practice without the normal game mechanics.
Use this before your first live game.
Look for:
- Incorrect answers marked as correct
- Missing answer choices
- Typographical errors
- Ambiguous wording
- Questions that take too long to read
- Incorrect images
- Questions that don’t match your lesson
Make Your Gimkit More Educational
A game format can make review more enjoyable, but the educational value still depends on the questions.
Use this simple rule:
Every question should have a reason for being there.
Before keeping a question, ask:
“What does the answer tell me about what my students know?”
If the answer is “nothing,” rewrite the question.
Gimkit Question Design Checklist
- Before publishing your Kit:
- Every question connects to the lesson.
- Every correct answer is accurate.
- Incorrect answers are plausible.
- Questions match the grade level.
- Wording remains clear.
- Questions include a useful mix of difficulty.
- You avoid unnecessary trick questions.
- Images support the question where used.
- You checked spelling and punctuation.
- You tested the Kit before class.
What to Do After Creating Your Gimkit
Once your Kit is ready, you can use it in different ways.
For live classroom play, use a supported game mode and host the activity.
For independent practice, Gimkit provides Practice Mode.
For homework or asynchronous practice, Gimkit also offers Assignments for supported accounts. Gimkit’s current documentation says Assignments let students play on their own time, while its account documentation identifies Assignments as a Pro feature.
If you use Classes, students can also connect to your class and access class related activities. Gimkit’s current platform allows educators to create classes from the dashboard.
How to Turn Your Gimkit Into a Full Lesson
Don’t make the game the entire lesson.
Try this structure:
5 minutes
Review yesterday’s learning.
10 minutes
Teach the new concept.
10 minutes
Guided practice.
10 minutes
Gimkit review.
5 minutes
Discuss common mistakes.
5 minutes
Exit ticket.
Now the game has a clear instructional purpose.
Common Mistakes Teachers Make When Creating a Gimkit
Making Every Question Easy
Students may enjoy quick success, but they don’t get enough challenge.
Writing Too Many Questions
More isn’t always better.
Using Only Recall Questions
Students need opportunities to apply and explain concepts.
Copying Questions Without Reviewing Them
Public content can contain errors or mismatched curriculum.
Using Distractors That Are Obviously Wrong
Strong distractors should represent realistic misconceptions.
Ignoring Accessibility
Consider reading level, visual clarity, audio needs, and other student requirements.
Treating the Game Score as the Grade
A game score can provide useful information, but it shouldn’t automatically become a formal academic grade.
Frequently Asked Questions
How do I make a Gimkit?
Sign in to your educator account, go to your dashboard, select New Kit, enter the Kit name, language, and subject, then add questions and answers. When you’re finished, select All Done.
Can I make a Gimkit for free?
Yes. Gimkit currently offers a free Basic educator account that lets teachers create Kits and host games. Some advanced features require Gimkit Pro.
Can I import questions into Gimkit?
Yes. Gimkit supports importing questions through a CSV spreadsheet.
Can I use questions created by other teachers?
Yes. Gimkit’s Question Bank lets teachers search public Kits and add questions to their own Kits. Review every question before using it with students.
Can I edit a Gimkit after creating it?
Yes. You can edit Kits you own, add questions, modify questions, delete questions, and make other changes through the Kit editor.
Can I copy an existing Gimkit?
Yes. Gimkit lets you copy a Kit and then rename or edit the copy.
Do students need Gimkit accounts?
Not necessarily. Gimkit’s current account FAQ says students can join live games and assignments without an account. Students need accounts for features such as Classes and earning XP and purchasing cosmetics.
Can I make a Gimkit for homework?
Yes, through Gimkit Assignments. However, Gimkit currently lists Assignments as a Pro feature.
Final Thoughts
Learning how to make a Gimkit takes only a few minutes. Making a good Gimkit takes a little more thought.
Start with your learning objective.
Then write questions that help students practice or demonstrate that objective.
Use a mix of difficulty levels. Include realistic distractors. Check your answers. Preview the Kit before class. Most importantly, use the information you get from student responses to decide what you should teach next.
The game creates the engagement.
Your questions create the learning.
Official Gimkit resources
Gimkit, Create a Kit from Scratch